Defining user and group functions
You can use the Macro Language tag <resource> to define a
resource for Macro Language using Python code. You can also use
<def_ufun> and <def_gfun> to define your own
Python functions within the Macro Language Workshop.
The <resource> tag consists of definitions relevant for a particular
language. The <def_ufun> tag allows you to create your own functions
that work in a row-by-row or scalar context, while the <def_gfun>
tag allows you to create your own group or tabulation functions.
<resource>, <def_ufun>, and <def_gfun> in the
1010data Reference Manual for a detailed description of these tags, including
syntax and a list of attributes.Example: Defining natural language processing functions
The following example defines a Macro Language resource called
"nlp", written in Python, and using the open source library spaCy.
Then we use <def_ufun> to define the functions
clean_tokenizer_to_csl and
clean_lemmatizer_to_csl. Each function takes a string as an
argument and returns a string. The functions themselves are written in Python.
Finally, we create a table in Macro Language and create two columns with
<willbe>—csl_toks and
csl_lems—that make use of the new functions that tokenize and
lemmatize the string in sent, respectively.
<library>
  <resource for="python" name="nlp">
<![CDATA[
import spacy
nlp = spacy.load('en_core_web_sm')
]]>
  </resource>
  <resource for="mdb" name="nlp">
    <def_ufun name="clean_tokenizer_to_csl" args="x" types="s(s)">
      <code language_="python">
<![CDATA[
r = [','.join([x.text for x in nlp(s) if not x.is_stop]) for s in x]
]]>
      </code>
    </def_ufun>
    <def_ufun name="clean_lemmatizer_to_csl" args="x" types="s(s)">
      <code language_="python">
<![CDATA[
r = [','.join([x.lemma_ for x in nlp(s) if not x.is_stop]) for s in x]
]]>
      </code>
    </def_ufun>
  </resource>
</library>
<table cols="ind,sent">
1,"The quickest brown-fox"
2,"jumped over the lazy dog"
3,"jumped over the lazy dog's ears"
4,"jumped over the lazy dog's tail"
</table>
<willbe name="csl_toks" value="nlp.clean_tokenizer_to_csl(sent)"/>
<willbe name="csl_lems" value="nlp.clean_lemmatizer_to_csl(sent)"/>
The resulting table looks like the following:

Example: Quantile function across a row of data
The following example defines a quantile function in Python and applies it across
each row of data. First, we define two functions: r_quantile and
mk_lst_nms. r_quantile takes as its arguments
w, a list of columns on which to apply the quantile, and
p, a float that contains the quantile, and returns a float,
which is the value of the arrays at the given quantile. mk_lst_nms
takes as its arguments s, a string, and n, an
integer, and returns a string, which is a comma-separated list of the names of the
column data. Then in Python, we create a table with 5 rows and 10 columns, populated
with random data. Finally, we use <willbe> and the newly created
r_quantile function, containing a quantile of .5, to create the
med column. The med column contains the median
of the values of each row.
<base table="default.lonely"/>
<library>
  <def_ufun name="r_quantile" args="w;p" types="f(Ln;f)">
    <code language_="python">
<![CDATA[
# w is initially a list of numpy arrays
# first turn into numpy matrix
# then take quantile along rows.
r = np.quantile(np.array(w),p,axis = 0)
]]>
    </code>
  </def_ufun>
  <def_ufun name="mk_num_nms" args="s;n" types="s(s;i)">
    <code language_="python">
<![CDATA[
r = [s + str(i) for i in range(0,n)]
]]>
    </code>
  </def_ufun>
</library>
<code language_="python">
<![CDATA[
nr, nc = 5,10
# note that I'm creating a table, NOT a matrix
dat = [np.random.randn(nr) for i in range(0,nc)]
nms = ['x' + str(i) for i in range(0,nc)]
md = ten.MetaData().from_arrays(dat, names = nms, labels = nms)
ops = ten.rebase(dat,md)
]]>
</code>
<willbe name="med" value="r_quantile({mk_num_nms('x';10)};0.5)"/>
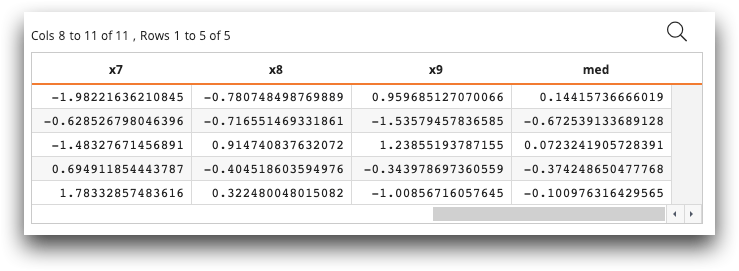
The resulting table looks similar to the following:

The last column, med, contains the .5 quantile (median) of each row.
