Creating layouts with multiple tab panels
You can effectively organize your QuickApp and its widgets by creating multiple tab panels.
Difficulty

Objective
You have created several widgets but want a more organized way to view them. By creating multiple tab panels, you are able to view each widget separately but still maintain easy access to all widgets.
Solution
<dynamic>
  <layout type_="tabpanel" margin_="5px 0px 0px 12" background_="#F3F1F0"
   height_="480" width_="1120">
    <layout label_="Sales by Store" height_="420" background_="#F3F1F0">
      <widget class_="graphics" width_="1098" height_="420"
       base_="pub.doc.retail.altseg.sales_detail_transid">
        <tabu label="Tabulation on Sales" breaks="store">
          <tcol source="xsales" fun="sum" label="Sum by Store"/>
        </tabu>
        <graphspec>
          <chart type="pie" title="Sales by Store"/>
        </graphspec>
      </widget>
    </layout>
    <layout label_="Sales by Date" height_="420" background_="#F3F1F0">
      <widget class_="graphics" width_="1000" height_="420"
       base_="pub.doc.retail.altseg.sales_detail_transid">
        <sel value="year(trans_date)=2015"/>
        <col name="trans_date" format="type:date"/>
        <tabu label="Tabulation on Sales" breaks="trans_date">
          <tcol source="xsales" fun="sum" label="Sum of`Sales"/>
        </tabu>
        <graphspec width="888" height="480">
          <chart type="line" title="Sum of Sales Over Time"
           samples="100000">
            <data x="trans_date" y="t0"/>
            <grid hide="1"/>
            <axes xlabel="Date" ylabel="Sum of Sales"/>
            <ticks xrot="45" yrot="0"/>
          </chart>
          <style xaxissize="14" xaxislabelsize="18" yaxissize="14"/>
        </graphspec>
      </widget>
    </layout>
    <layout label_="Data" height_="420" background_="#F3F1F0">
      <widget class_="grid" type_="scroll"
       base_="pub.doc.retail.altseg.sales_detail_transid"
       label_="Store Selection" rowcol_="1" width_="1100"/>
    </layout>
  </layout>
</dynamic>
Discussion
Tabpanels are simply one type of layout available for organizing your QuickApps. You use the
type_ attribute to declare which layout you would like to use. This
recipe declares the type to be tabpanel in the main layout. In this
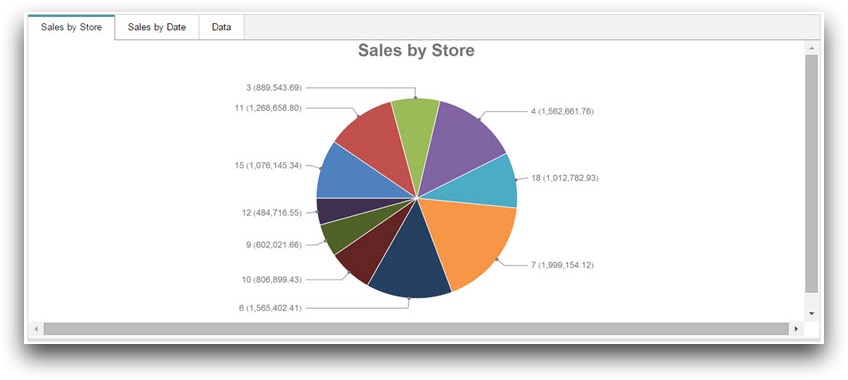
solution, three individual tab panels, labeled here as Sales By Date,
Sales By Store, and Data, are created as
sub-layouts within the main tabpanel layout. These labels were specified by entering the
label values in the label_ attribute. Then, within each tab layout, you
can create the desired widget that will be shown within that tabpanel.
The image below shows the QuickApp in this solution with each widget on a separate tab panel.

Common errors
- Only <layout> tags are permitted in <layout type_="tabpanel">.
- Tabpanel is limited in regards to nested layouts. Once you have used the tabpanel in each tab,
you can only incorporate images or widgets. The tabpanel prevents the user from adding
additional layouts, for instance, another tabpanel within one of the original tabs. If
you attempt to add another tabpanel (i.e.,
<layout
            type_="tabpanel">
), you will get this error.
Further reading
If you would like to learn more about the functions and operations discussed in this recipe, click on the links below:
