QuickApps allow you to specify a condition that controls whether a particular widget
is visible or hidden.
Up until this point, the grid widget has only been used to display the results of its
associated query. However, you can add a level of interaction with the grid widget by
utilizing the clickable_ attribute, which specifies the names of one or
more columns whose cells will be clickable.
You could imagine that when a brand or group description is clicked in the grid
widget, the QuickApp could display a list of all the SKUs related to that item in a list
widget. However, you would not want to display the list widget if the user had not clicked
anything in the grid widget. You could use the require_ attribute to the
<widget> tag to specify that condition. You could then use the
invmode_ attribute to specify the behavior when the condition is not met
(i.e., when the widget is invalidated).
To display a widget conditionally:
-
Add a
clickable_ attribute to the grid widget, which specifies
which column is clickable, and assign the value of the clicked cell to a new dynamic
variable called clicked_value.
  ...

<dynamic selection="19" product_master="pub.doc.retail.product"
 sales_detail="pub.doc.retail.salesdetail" aggregate_by="groupdesc_prod"
 mode_="auto" display_chart="1" clicked_value="">

  ...

  <widget class_="grid" base_="{@sales_detail}" insert_="sales_by_date"
   prod_table="{@product_master}" department="{@selection}"
   group_by="{@aggregate_by}"
   invmsg_="Click Run for changes to take effect"
   holdfor_="@aggregate_by,@selection"
   clickable_="{@aggregate_by}" value_="@clicked_value"/>

  ...
The new dynamic variable clicked_value is declared in the
opening <dynamic> tag and set to the empty string.
In addition, the clickable_ attribute has been added to the grid
widget and has been set to the value of the aggregate_by dynamic
variable, which is initially set to groupdesc_prod.
The value_ attribute specifies that when an item in the grid widget is
clicked, its value will be assigned to the clicked_value dynamic
variable.
-
Click Apply.
The items in the groupdesc_prod column are clickable.
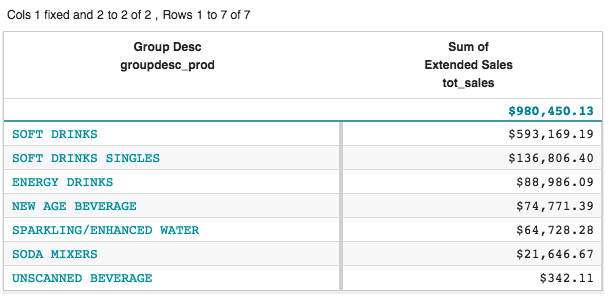
-
Click any item in the clickable column.
The clicked value is stored in the clicked_value dynamic
variable.
-
Create a list widget that displays the item descriptions for all the SKUs in
the Product Master table related to the item clicked in the grid
widget.
  ...

  <widget class_="graphics" base_="{@sales_detail}" width_="800"
   insert_="sales_by_date" prod_table="{@product_master}"
   department="{@selection}" group_by="{@aggregate_by}"
   invmsg_="Click Run for changes to take effect"
   visible_="{@display_chart}" holdfor_="@aggregate_by,@selection">
    <graphspec>
      <chart type="bar">
        <data x="{@aggregate_by}" y="tot_sales"/>
        <ticks xrot="45"/>
        <style xaxissize="10" yaxissize="10"/>
      </chart>
    </graphspec>
  </widget>
  <widget class_="list" base_="{@product_master}"
   width_="500" maxheight_="600">
    <if test="{@aggregate_by = 'brand_prod'}">
      <then>
        <sel value="(brand='{@clicked_value}')"/>
      </then>
      <else>
        <sel value="(groupdesc='{@clicked_value}')"/>
      </else>
    </if>
    <colord cols="sku,description"/>
    <sort col="description" dir="up"/>
  </widget>
</dynamic>
The base_ attribute, which is set to the value of the
product_master dynamic variable, specifies that the new list widget
uses the Product Master table. The query associated with the list
widget selects the rows in that table that have either the same brand or the same group
description as the item clicked in the grid. It determines this by checking the value of
the aggregate_by dynamic variable in the <if>
clause and performs the appropriate <sel> operation based on that.
It then performs a <colord> operation to create a two-column table
used by the list widget; the first column contains the SKUs, and the second column
contains the item descriptions. Finally, the <sort> operation
ensures that the item descriptions are displayed in ascending order in the list
widget.
The list widget should only be displayed once an item has been clicked in the
grid widget. Otherwise, the list widget should be hidden. You can enforce this behavior by
adding a require_ attribute to the list widget which specifies that the
clicked_value dynamic variable must be equal to something other than the
empty string. If this condition is not met, the list widget will be invalidated. You can set
the invmode_ attribute to hide so that the list widget is
hidden when it is invalidated.
-
Add a
require_ attribute to the list widget and set the
invmode_ attribute to hide.
  ...

  <widget class_="list" base_="{@product_master}"
   width_="500" maxheight_="600"
   require_="{@clicked_value <> ''}" invmode_="hide">
    <if test="{@aggregate_by = 'brand_prod'}">
      <then>
        <sel value="(brand='{@clicked_value}')"/>
      </then>
      <else>
        <sel value="(groupdesc='{@clicked_value}')"/>
      </else>
    </if>
    <colord cols="sku,description"/>
    <sort col="description" dir="up"/>
  </widget>
</dynamic>
The
require_ attribute can take an expression that is either true or
false. If the expression is false, the widget is invalidated. In this example, if the
value of the
clicked_value dynamic variable is equal to the empty
string, then the expression
{@clicked_value <> ''} is false, and the
widget is invalidated.
Note: The expression specified for the require_
attribute must be enclosed within curly braces.
-
Click Apply.
Since clicked_value is initially set to an empty string in
the opening <dynamic> tag, the condition specified by the
require_ attribute is not true. Therefore, the list widget is
invalidated. Since the invmode_ for the list widget is set to
hide, the list widget is hidden.
-
Click an item in the grid widget (e.g., SOFT
DRINKS).
The list widget is populated with the item descriptions for those SKUs in the
Product Master table that match the group description clicked in
the grid widget.
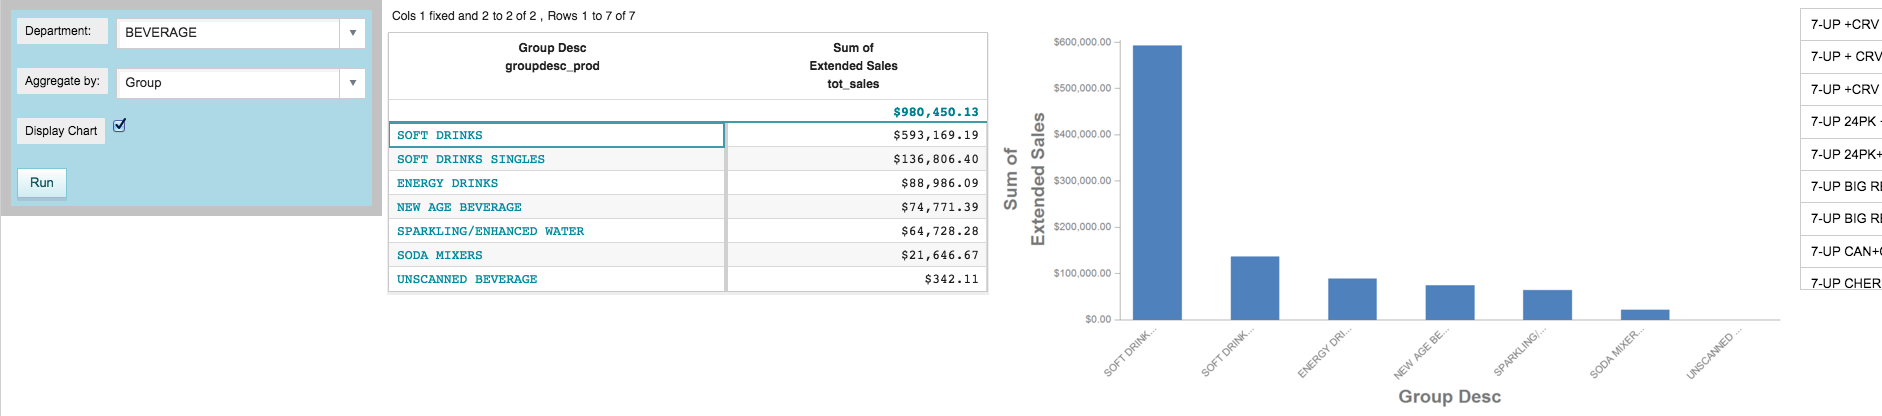
The list widget appears to the right of the graphics widget. Because the screen is not
wide enough to accommodate it, only half the widget is visible without scrolling to the
right.
Since the width of the QuickApp is becoming too wide to fit on the screen
without scrolling, it might make more sense to position the list widget below the grid
widget. This can be accomplished by using <layout> tags.
-
Add
<layout> tags to organize the widgets.
  ...

<dynamic selection="19" product_master="pub.doc.retail.product"
 sales_detail="pub.doc.retail.salesdetail" aggregate_by="groupdesc_prod"
 mode_="auto" display_chart="1" clicked_value="">
  <layout background_="lightblue" border_="10">
    <widget class_="dropdown" base_="{@product_master}"
     inputwidth_="250" value_="@selection"
     label_="Department:" labelwidth_="75">
      <tabu label="Tabulation on Product Master" breaks="deptdesc">
        <break col="deptdesc" sort="up"/>
        <tcol source="dept" name="dept" fun="first"
         label="First`Department"/>
      </tabu>
      <colord cols="dept,deptdesc"/>
    </widget>
    <widget class_="dropdown" value_="@aggregate_by"
     label_="Aggregate by:" labelwidth_="75" inputwidth_="250">
      <table>groupdesc_prod,Group;brand_prod,Brand
      </table>
    </widget>
    <widget class_="checkbox" label_="Display Chart"
     value_="@display_chart"/>
    <widget class_="button" text_="Run" type_="submit"/>
    <ignore>
      <widget class_="text" text_="Current selection: {@selection}"/>
    </ignore>
  </layout>
  <layout>
    <layout>
      <widget class_="grid" base_="{@sales_detail}" insert_="sales_by_date"
       prod_table="{@product_master}" department="{@selection}"
       group_by="{@aggregate_by}"
       invmsg_="Click Run for changes to take effect"
       holdfor_="@aggregate_by,@selection"
       clickable_="{@aggregate_by}" value_="@clicked_value"/>
      <widget class_="graphics" base_="{@sales_detail}" width_="800"
       insert_="sales_by_date" prod_table="{@product_master}"
       department="{@selection}" group_by="{@aggregate_by}"
       invmsg_="Click Run for changes to take effect"
       visible_="{@display_chart}" holdfor_="@aggregate_by,@selection">
        <graphspec>
          <chart type="bar">
            <data x="{@aggregate_by}" y="tot_sales"/>
            <ticks xrot="45"/>
            <style xaxissize="10" yaxissize="10"/>
          </chart>
        </graphspec>
      </widget>
    </layout>
    <layout>
  <widget class_="list" base_="{@product_master}"
   width_="500" maxheight_="600"
   require_="{@clicked_value <> ''}" invmode_="hide">
    <if test="{@aggregate_by = 'brand_prod'}">
      <then>
        <sel value="(brand='{@clicked_value}')"/>
      </then>
      <else>
        <sel value="(groupdesc='{@clicked_value}')"/>
      </else>
    </if>
    <colord cols="sku,description"/>
    <sort col="description" dir="up"/>
  </widget>
    </layout>
  </layout>
</dynamic>
As noted in Organize widgets using a layout, the arrangement of widgets
will alternate vertically and horizontally with each embedded
<layout>.
In this example, the outermost set of newly-added <layout> tags
creates a container that will be arranged horizontally with the original
<layout> containing the drop-down widgets and
Run button.
Inside this new <layout>, two more sets of
<layout> tags have been added. The containers created by these
<layout> tags will be arranged vertically, and their contents will
be arranged horizontally.
The container created by the first new innermost set of <layout>
tags will appear on top, and inside this container, the grid and graphics widgets will
be arranged horizontally. Similarly, the container created by the second new innermost
set of <layout> tags will appear below the top container, and the
new list widget will appear inside it.
-
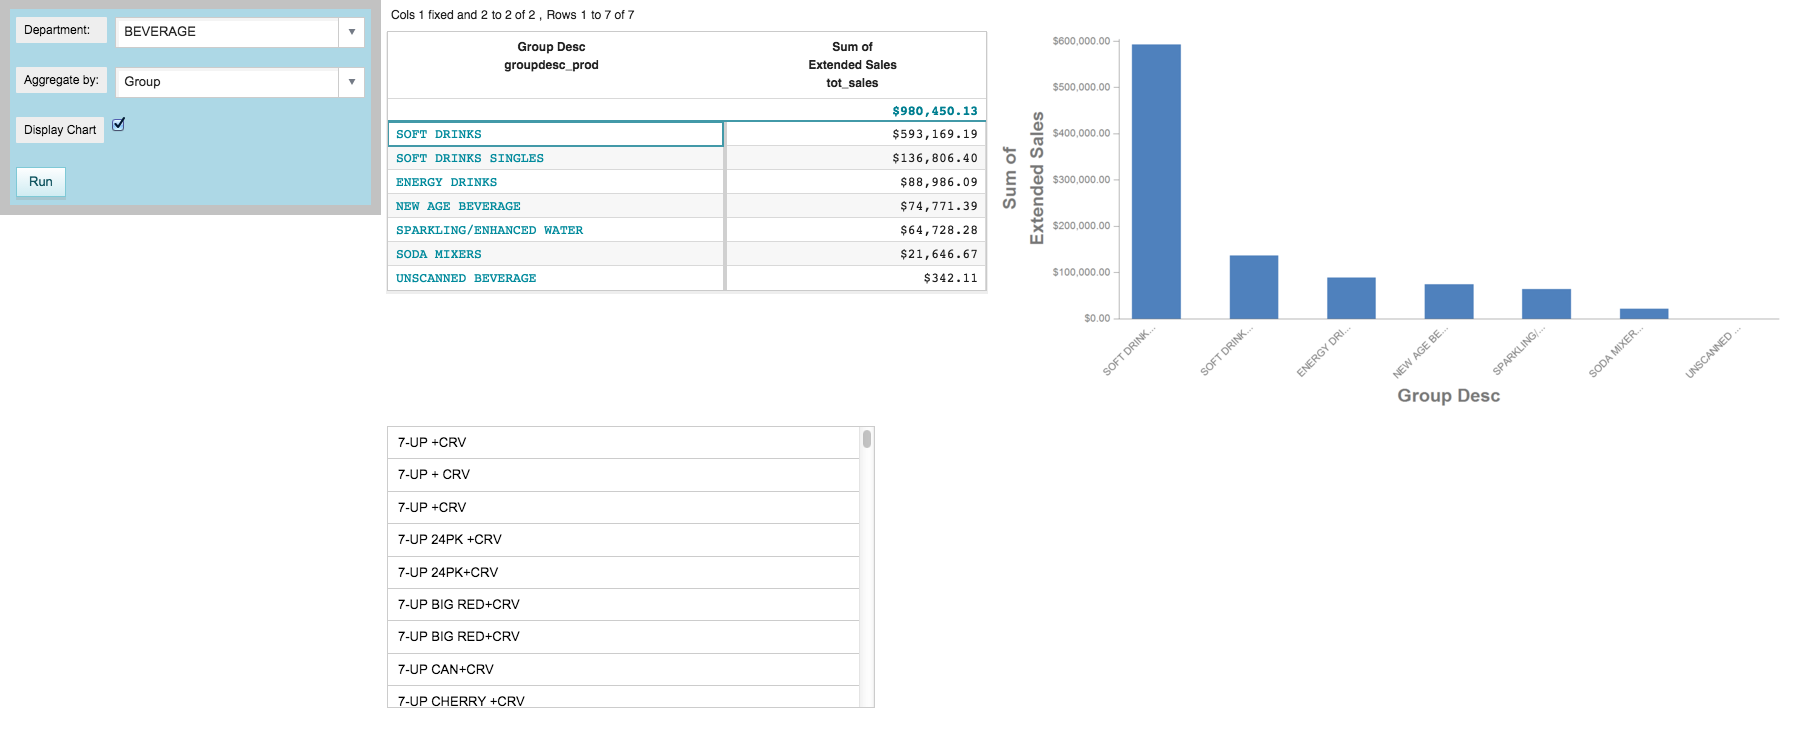
Click Apply.
Since the list widget is initially invalidated, it is hidden.
-
Click an item in the grid widget (e.g., SOFT
DRINKS).
The list widget appears below the grid widget and displays the item descriptions for
those SKUs in the Product Master table that match the group
description that was clicked.
Cumulative QuickApp code
The Macro Language code for the QuickApp up to this point is:
<defblock name="sales_by_date" prod_table="" department="" group_by="">
  <link table2="{@prod_table}" col="sku" col2="sku"
   suffix="_prod" type="select">
    <sel value="dept={@department}"/>
  </link>
  <tabu label="Tabulation on Sales Detail" breaks="{@group_by}">
    <tcol source="xsales" fun="sum" name="tot_sales"
     label="Sum of`Extended Sales" format="type:currency"/>
  </tabu>
  <sort col="tot_sales" dir="down"/>
  <sel value="({@group_by} <> '')"/>
</defblock>
<dynamic selection="19" product_master="pub.doc.retail.product"
 sales_detail="pub.doc.retail.salesdetail" aggregate_by="groupdesc_prod"
 mode_="auto" display_chart="1" clicked_value="">
  <layout background_="lightblue" border_="10">
    <widget class_="dropdown" base_="{@product_master}"
     inputwidth_="250" value_="@selection"
     label_="Department:" labelwidth_="75">
      <tabu label="Tabulation on Product Master" breaks="deptdesc">
        <break col="deptdesc" sort="up"/>
        <tcol source="dept" name="dept" fun="first" label="First`Department"/>
      </tabu>
      <colord cols="dept,deptdesc"/>
    </widget>
    <widget class_="dropdown" value_="@aggregate_by"
     label_="Aggregate by:" labelwidth_="75" inputwidth_="250">
      <table>groupdesc_prod,Group;brand_prod,Brand
      </table>
    </widget>
    <widget class_="checkbox" label_="Display Chart"
     value_="@display_chart"/>
    <widget class_="button" text_="Run" type_="submit"/>
    <ignore>
      <widget class_="text" text_="Current selection: {@selection}"/>
    </ignore>
  </layout>
  <layout>
    <layout>
      <widget class_="grid" base_="{@sales_detail}"
       insert_="sales_by_date" prod_table="{@product_master}"
       department="{@selection}" group_by="{@aggregate_by}"
       invmsg_="Click Run for changes to take effect"
       holdfor_="@aggregate_by,@selection"
       clickable_="{@aggregate_by}" value_="@clicked_value"/>
      <widget class_="graphics" base_="{@sales_detail}" width_="800"
       insert_="sales_by_date" prod_table="{@product_master}"
       department="{@selection}" group_by="{@aggregate_by}"
       invmsg_="Click Run for changes to take effect"
       visible_="{@display_chart}" holdfor_="@aggregate_by,@selection">
        <graphspec>
          <chart type="bar">
            <data x="{@aggregate_by}" y="tot_sales"/>
            <ticks xrot="45"/>
            <style xaxissize="10" yaxissize="10"/>
          </chart>
        </graphspec>
      </widget>
    </layout>
    <layout>
      <widget class_="list" base_="{@product_master}"
       width_="500" maxheight_="600"
       require_="{@clicked_value <> ''}" invmode_="hide">
        <if test="{@aggregate_by = 'brand_prod'}">
          <then>
            <sel value="(brand='{@clicked_value}')"/>
          </then>
          <else>
            <sel value="(groupdesc='{@clicked_value}')"/>
          </else>
        </if>
        <colord cols="sku,description"/>
        <sort col="description" dir="up"/>
      </widget>
    </layout>
  </layout>
</dynamic>