<xlsx>
The <xlsx> element provides the ability to customize the appearance
of output when rendering to a Microsoft Excel workbook. (Available as of
prod-9)
Description
When rendering a QuickApp to an Excel workbook, it is possible to specify attributes for
output rendering at both the <render> level and the
<widget> level. When specifying configuration options at the
<render> level, use the attributes as they are shown below. To specify
configuration options at the <widget> or <layout>
level, the attributes must be prefixed with the string: xlsx_.
For example, All options for the <render> element can also be specified
at the level of a local widget. For example:
<render>
  <xlsx margins_="1;1;.25"/>
</render>
can also be specified at the local widget level by prepending the output target type to the attribute, as follows:
<widget class_="grid" xlsx_margins_="1;1;.25"/>
Properties specified at the local widget level override properties set within the
<render> element. It is also important to note that global properties
specified in the <render> element will only be applied to widgets that
specify a worksheet name using the following attribute at the widget level:
<widget class_="grid" xlsx_sheetname_="My Worksheet"/>
Syntax
<dynamic>
  <render>
    <xlsx [ATTR1_NAME]="[VALUE]"
          [ATTR2_NAME]="[VALUE]"
           ... />
  </render>
</dynamic>
Alternate syntax
<dynamic>
    <widget class_="grid"
            xlsx_[ATTR1_NAME]="[VALUE]"
            xlsx_[ATTR2_NAME]="[VALUE]"
            ... />
</dynamic>
Attributes
filename_- Specifies an optional file name of the Excel file. If omitted, the default file name is download.xlsx.
xlsx_sheetname_- Specifies the sheet tab name the widget or layout is rendered to in the Excel
workbook. If omitted, the default worksheet title will be used (e.g.,
Sheet1).
If the specified name is greater than 31 characters, it is truncated to meet Excel's restrictions on worksheet name length.
Note: Thexlsx_sheetname_attribute can only be specified at the<widget>or<layout>level. It cannot be specified as an attribute to the<xlsx>child element of<render>. xlsx_printtitle_- Specifies whether or not the
<widget>or<layout>to which this attribute is applied appears at the top of every page when the worksheet is printed. Accepts a1or0.Note: This attribute can only be set on at most one<widget>or<layout>. It cannot be specified as an attribute to the<xlsx>child element of<render>. filtered_- Specifies whether or not the resultant Excel spreadsheet will have filter buttons on
tables created from the grid widgets of the QuickApp. Accepts
1or0. type_- When
type_="range", grids will be rendered into normal cell ranges in the Excel spreadsheet, as opposed to a table. orientation_- Specifies the page orientation of the current worksheet
when printed.
Valid values are:
landscapeportrait
pageorder_- Specifies the order in which to print pages when a widget
exceeds a single page.
Valid values are:
down- Print down then over.
over- Print over then down.
The default is
down. scale_- Specifies the scale or "zoom" level of the worksheet when
printed. Accepts an integer value representing the percentage of the document's actual
size between
10and400.The default is
100.Note: The attributescale_should be omitted or set to0when usingfitheight_and/orfitwidth_. fitwidth_- Specifies the maximum number of horizontal pages on which to
fit the entire worksheet when printed.Note: The attribute
scale_should be omitted or set to0when usingfitheight_and/orfitwidth_. fitheight_- Specifies the maximum number of vertical pages on which to
fit the entire worksheet when printed.Note: The attribute
scale_should be omitted or set to0when usingfitheight_and/orfitwidth_. headers_- Specifies what to print in all page headers when the worksheet is printed. Accepts text and valid Excel formatting codes.
footers_headers_odd_- Specifies what to print in the headers on odd page numbers when the worksheet is printed. Accepts text and valid Excel formatting codes.
footers_odd_- Specifies what to print in the footers on odd page numbers when the worksheet is printed. Accepts text and valid Excel formatting codes.
headers_even_- Specifies what to print in the headers on even page numbers when the worksheet is printed. Accepts text and valid Excel formatting codes.
footers_even_- Specifies what to print in the footers on even page numbers when the worksheet is printed. Accepts text and valid Excel formatting codes.
headers_first_- Specifies what to print in the header of the first page of the document when the worksheet is printed. Accepts text and valid Excel formatting codes.
footers_first_- Specifies what to print in the footer of the first page of the document when the worksheet is printed. Accepts text and valid Excel formatting codes.
margins_- Specifies the margins of the worksheet when printed. Accepts
decimal numbers representing inches.
Margins are specified at the
<render>level as follows:<render> <xlsx margins_="[LEFT/RIGHT_MARGIN];TOP/BOTTOM_MARGIN;HEADERS/FOOTERS_MARGIN"/> </render>To specify the same options at the
<widget>level, use the following syntax:<dynamic> <widget class_="grid" xlsx_margins_="[LEFT/RIGHT_MARGIN];TOP/BOTTOM_MARGIN;HEADERS/FOOTERS_MARGIN"/> </dynamic>Values for
margins_can be entered as a single number for each variable when corresponding margins are the same (i.e., the left margin and right margin are both1inch, or as two values separated by a comma (,) if different margin sizes are desired (i.e., the top margin should be.25inches and the bottom margin should be.5inches) would be specified with the following value:"1;.25,.5;0" papersize_- Specifies the paper size to use when printed.
Valid values are as follows:
Letter- 8.5 x 11 in. (default)Tabloid- 11 x 17 in.Ledger- 17 x 11 in.Legal- 8.5 x 14 inStatement- 5.5 x 8.5 in.Executive- 7.25 x 10.5 in.Folio- 8.5 x 13 in.Note8.5 x 11 inQuarto- 215 x 275 mmA3- 297 x 420 mm.A4- 210 x 297 mmA5- 148 x 210mmA6- 105 x 148 mmB4- 250 x 353 mmB5- 176 x 250 mmC- 17 x 22 inD- 22 x 34 inE- 34 x 44 in
render_text_- This attribute specifies whether or not to render
textwidgets into Excel TextBox objects. Accepts a1or0.Thestyle_,color_,width_, andheight_attributes (or the correspondingxlsx_[attr]_attributes when specified at the<widget>level) are used to configure the rendered TextBox in Excel. If a width or height is not specified, the renderer computes an estimated size for the TextBox. However, this may not fit the text exactly, so use the attributes to size as desired.Note: Thestyle_attribute only interprets the following CSS properties during render:font-family,color,font-size,font-weight,font-style).To include newlines in the text, the value of the
text_attribute for the corresponding<widget class_="text">must be enclosed as a single-quoted string in curly braces so that any newline characters (i.e.,\n) will be evaluated correctly. For instance,<widget class_="text" text_="{'this\nthat'}"/>would render the text with a newline between this and that.The default is
0. render_textbox_- This attribute specifies whether or not to render
textboxwidgets into the Excel workbook. Accepts a1or0.Each line of text in the
textboxwidget is rendered as text in a separate cell in the output workbook.The default is
0.(Available as of version 11.06)
flatten_headers_- Specifies whether or not to change newlines in multi-line column labels into spaces when rendered to an Excel workbook. Accepts a
1or0.The default is
0. gridlines_- Specifies whether or not workbook grid lines are present when the Excel workbook is
printed. Accepts
1or0.Gridlines print only around actual data in a worksheet.
The default is
0.(Available as of version 12.09)
printfixedcols_- Specifies the columns that will appear on every page when the workbook is printed.
Accepts either an integer value or a range of the form
[FIRST_COLUMN]:[LAST_COLUMN].If an integer is provided, the first
ncolumns of the table will be printed on each page, wherenis the specified value. For example, forprintfixedcols_="3"specifies that the first three columns of thegridwidget will be printed on every page of the workbook.If a range of the form
[FIRST_COLUMN]:[LAST_COLUMN], the columns corresponding to those column numbers will be printed on each page. For example,printfixedcols_="2:3"specifies that the second and third columns should be printed on every page of the workbook.Note: This setting only works when specified once per Excel worksheet, so be sure to separate tables onto separate sheets (usingxlsx_sheetname_) for multiple tables in a single workbook.(Available as of version 12.14)
int64mode_- Specifies whether to convert 64-bit integer columns to either floating-point values or
string values in the rendered workbook, since XLSX files do not support 64-bit
integers.
Valid values are:
float- Convert 64-bit integer values to floating-point values.
string- Convert 64-bit integer values to string values.
If this attribute is not set, an error will occur when trying to render a table that contains 64-bit integer columns to an Excel workbook.
(Available as of version 11.25)
As of version 12.17, rendering 64-bit integer columns in XLSX respects the
formatattribute for a column (e.g., via the<col>or<willbe>operations). Setting this attribute totype:numortype:nocommason a bigint column indicates the 64-bit integer values should be rendered as floating-point values. Setting it totype:charrenders them as string values in the workbook. This allows individual columns to be specified differently. The attributeint64mode_is used to specify how to render 64-bit integer columns that are unspecified via the column format type.
grid widgets when rendered to an xlsx target.
<render> level as
attributes to <xlsx> or at the <widget> level as
attributes to <widget class_="grid">. If specified at the
<widget> level, the attributes must be begin with the prefix
xlsx_.headerbgcolor_- Accepts a string that specifies a valid CSS color value for the background color of
the column header.
The default is
#fff6d1. headerfontcolor_- Accepts a string that specifies a valid CSS color value for the font color of the
column header.
The default is
#081259. headerfontsize_- Accepts an integer value that specifies the font size of the column header.
The default is
14. headerfontfamily_- Accepts a string that specifies the font family of the column header.
The default is
Calibri. headerfontstyle_- Accepts a string that specifies the font style of the column header.
The default is
normal. headerfontweight_- Accepts a string that specifies the font weight of the column header.
The default is
normal. headertextalign_- Specifies the alignment of the text in the column header.
Valid values are:
leftcenterright
If this attribute is not specified, the alignment will depend on the type of data. By default, Excel right aligns numbers and left aligns strings.
dividercolor_- Accepts a string that specifies a valid CSS color value for the color of the line
below the column header and above the data cells as well as the line between fixed and
scrolling columns.
The default is
#f26f21. oddcellbgcolor_- Accepts a string that specifies a valid CSS color value for the color of
odd-numbered rows.
The default is
#ffffff. evencellbgcolor_- Accepts a string that specifies a valid CSS color value for the color of
even-numbered rows.
The default is
#dddddd. labelfontsize_- Accepts an integer value that specifies the font size of the grid title.
The default is
20. labelfontfamily_- Accepts a string that specifies the font family of the grid title.
The default is
Calibri. labelfontcolor_- Accepts a string that specifies a valid CSS color value for the font color of the
grid title.
The default is
#000000. labelfontstyle_- Accepts a string that specifies the font style of the grid title.
The default is
normal. labelfontweight_- Accepts a string that specifies the font weight of the grid title.
The default is
bold. subtitlefontsize_- Accepts an integer value that specifies the font size of the grid subtitle.
The default is
20. subtitlefontfamily_- Accepts a string that specifies the font family of the grid subtitle.
The default is
Calibri. subtitlefontcolor_- Accepts a string that specifies a valid CSS color value for the color of the grid
subtitle.
The default is
#000000. subtitlefontstyle_- Accepts a string that specifies the font style of the grid subtitle.
The default is
italic. subtitlefontweight_- Accepts a string that specifies the font weight of the grid subtitle.
The default is
normal. cellfontsize_- Accepts a string that specifies an integer value that specifies the font size of
grid cell data.
The default is
11. cellfontfamily_- Accepts a string that specifies the font family of grid cell data.
The default is
Calibri. cellfontcolor_- Accepts a string that specifies a valid CSS color value for the font color for grid
cell data.
The default is
#000000. cellfontstyle_- Accepts a string that specifies the font style of grid cell data.
The default is
normal. cellfontweight_- Accepts a string that specifies the font weight of grid cell data.
The default is
normal. celltextalign_- Specifies the alignment of the text in grid cells.
Valid values are:
leftcenterright
If this attribute is not specified, the alignment will depend on the type of data. By default, Excel right aligns numbers and left aligns strings.
Example: Specifying render options via <render> element
The following example demonstrates how render options specified via the
<xlsx> child element of <render> apply to all of
the applicable widgets when the QuickApp is rendered to an Excel workbook. In this example,
the headerbgcolor_ attribute specifies the value for the column header
background color in grid widgets. When the QuickApp is rendered to an Excel
workbook, the column headers for both grid widgets are red.
<dynamic>
  <render>
    <xlsx headerbgcolor_="red"/>
  </render>
  <widget class_="grid" base_="pub.demo.retail.item"/>
  <widget class_="grid" base_="pub.demo.retail.store"/>
</dynamic>
Example: Specifying render options via <widget> element
<widget> element apply to only to that widget. In this example, the
xlsx_headerbgcolor_ attributes specifies the value for the column header
background color. When the QuickApp is rendered to an Excel workbook, only the column header
for the first grid widgets is red. The column header in the other
grid widget is the default color.<widget>, it must begin with the prefix
xlsx_.<dynamic> <widget class_="grid" base_="pub.demo.retail.item" xlsx_headerbgcolor_="red"/> <widget class_="grid" base_="pub.demo.retail.store"/> </dynamic>
Example: Specifying render attributes at the <render> and
<widget> levels
The following example demonstrates a number of ways to specify render attributes for an
Excel target. The <xlsx> child element of <render>
specifies an orientation, header, and paper size for all pages when the Excel workbook is
printed via the orientation_, headers_, and
papersize_ attributes, respectively. It also specifies a left alignment
for both column headers and cell data with the headertextalign_ and
celltextalign_ attributes. The grid widget specifies a
sheet name of Data via the xlsx_sheetname_
attribute. The graphics widget specifies a sheet name of
Graph via the xlsx_sheetname_ attribute. The
graphics widget also specifies a paper size of Letter,
which overrides the paper size specified at the <render> level.
<dynamic>
<render>
<xlsx orientation_="landscape"
filename_="SalesbyStore.xlsx"
headers_="&LSales by Store&R&P of &N" papersize_="A4"
celltextalign_="left" headertextalign_="left"/>
</render>
<layout arrange_="v">
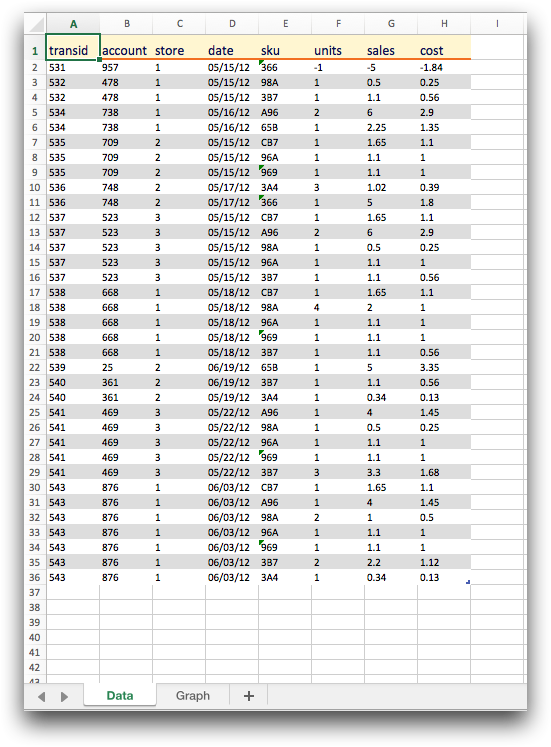
<widget class_="grid" base_="pub.demo.retail.item"
xlsx_sheetname_="Data"/>
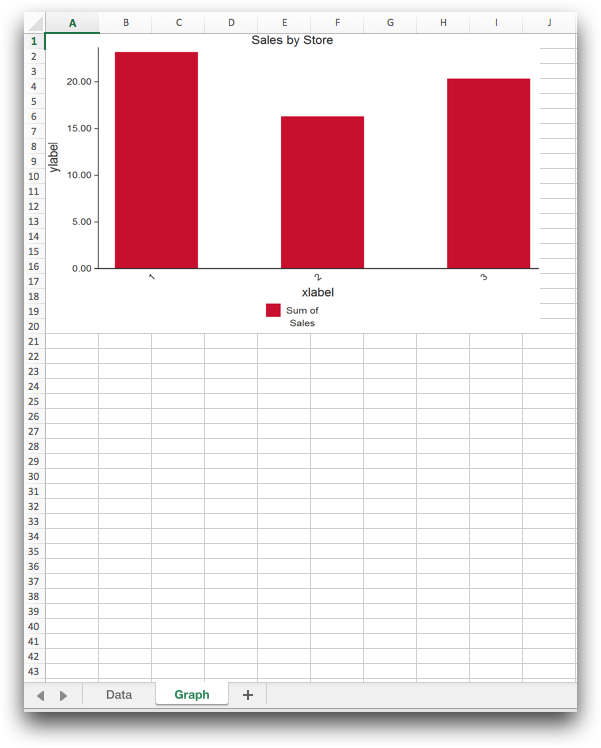
<widget class_="graphics" base_="pub.demo.retail.item"
width_="600" height_="400"
xlsx_papersize_="Letter" xlsx_sheetname_="Graph">
<tabu label="Tabulation on Sales Item Detail" breaks="store">
<tcol source="sales" fun="sum" label="Sum of`Sales"/>
</tabu>
<graphspec width="600" height="400">
<chart type="bar" title="Sales by Store" samples="25">
<data x="store" y="t0"/>
<legend hide="0"/>
<axes xlabel="xlabel" ylabel="ylabel" y2label="y2label"/>
<ticks xrot="40"/>
</chart>
</graphspec>
</widget>
<widget class_="button" type_="render" target_="xlsx" margin_="50"/>
</layout>
</dynamic>
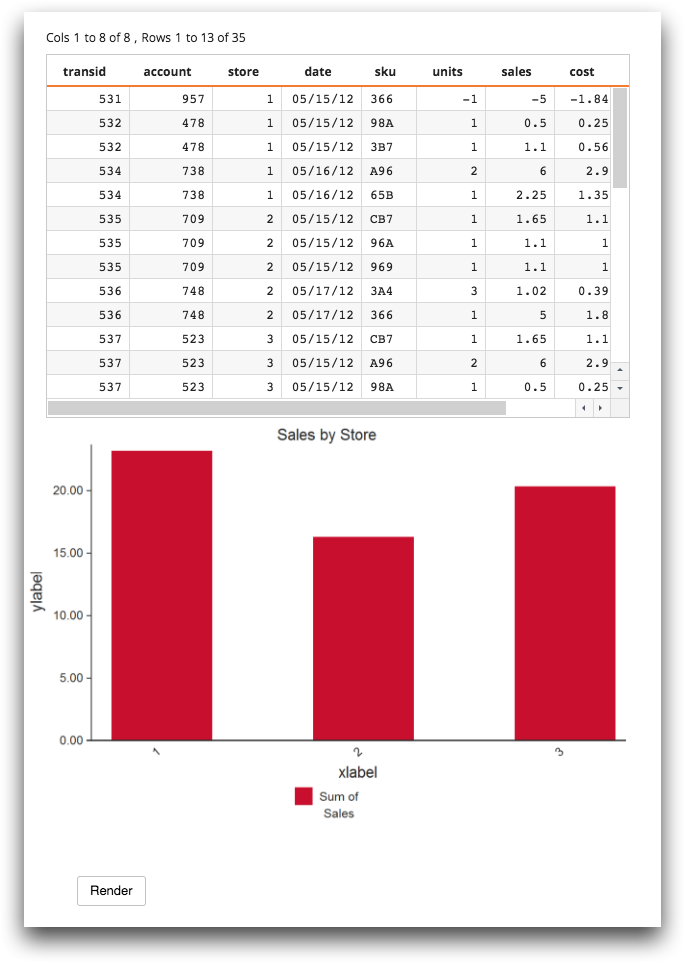
When the user clicks the Render button, the QuickApp is rendered to an Excel workbook containing two sheets, Data and Graph.
Example: Rendering text widgets to an Excel workbook
The following example demonstrates how to render text widgets to an Excel
workbook using the render_text_ attribute.
<dynamic>
<render>
<xlsx render_text_="1"/>
</render>
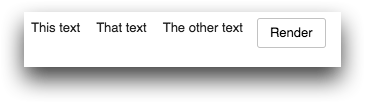
<widget name="this_text" class_="text"
text_="This text" xlsx_color_="purple"/>
<widget name="that_text" class_="text"
text_="That text" xlsx_color_="red"/>
<widget name="the_other_text" class_="text"
text_="The other text"/>
<widget class_="button" type_="render"
target_="xlsx" include_="this_text,that_text"/>
</dynamic>
When the QuickApp is rendered to the web, all three text widgets are
displayed.
When the user clicks the Render button, the two
text widgets listed in the include_ attribute are
rendered to an Excel workbook.
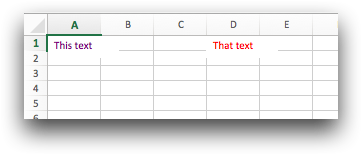
The text widgets are rendered because render_text_ is set
to 1 in the <xlsx> child element of
<render>. If render_text_ was set to
0 or was not specified, the text widgets would not be
rendered at all.
text widgets would
be rendered, since the include_ attribute only applies to the
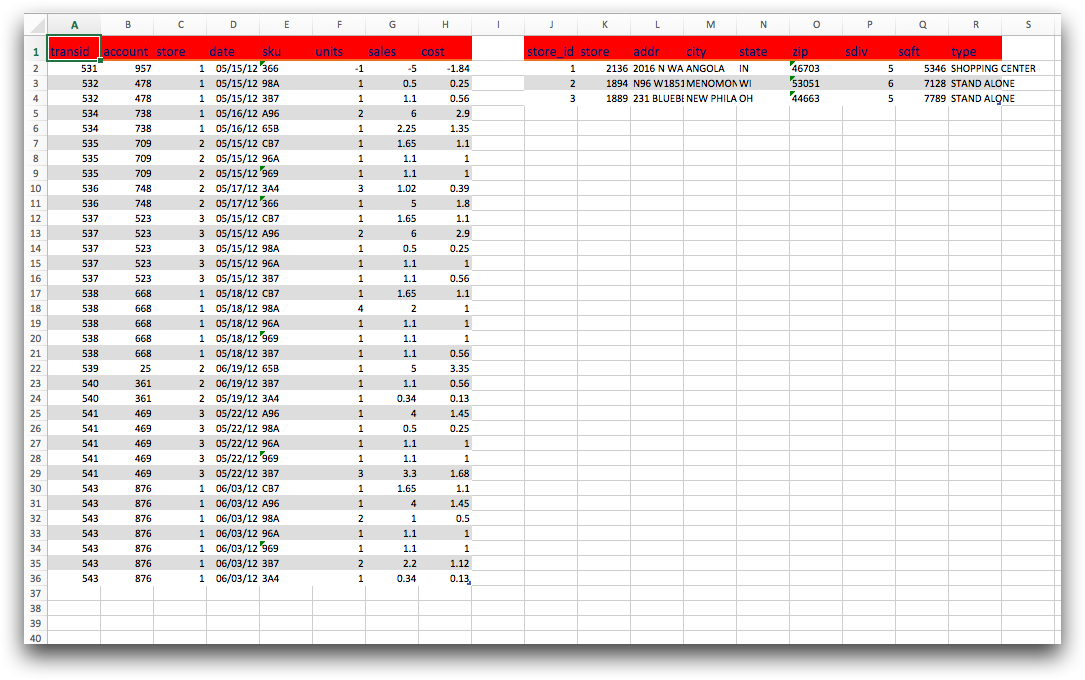
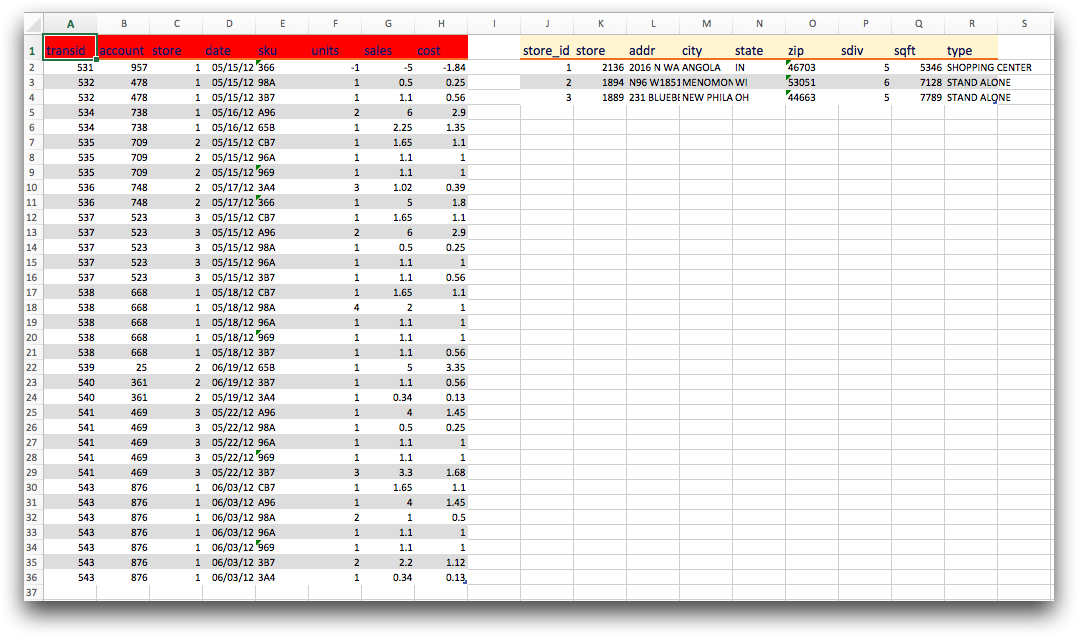
render button.Example: Rendering textbox widgets with mode_="xml"
to an Excel workbook
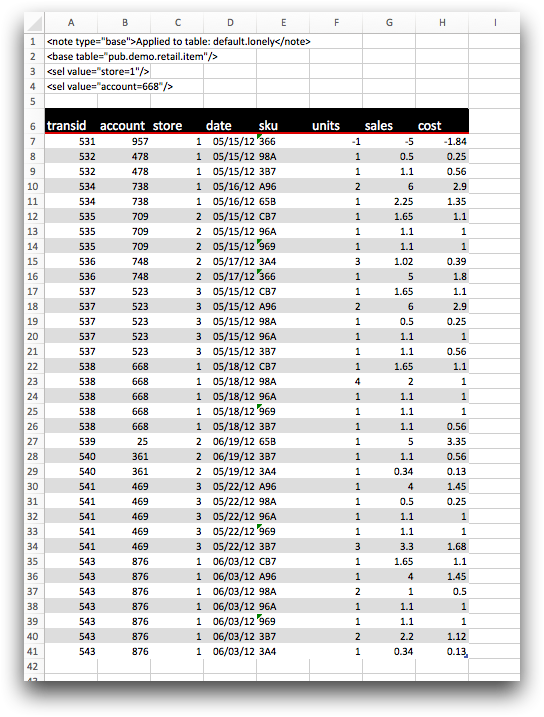
The following example demonstrates how to specify that textbox widgets are
rendered to an Excel workbook by setting render_textbox_="1" in the
<xlsx> element within the <render> tag. This
example shows how this works with textbox widgets with
mode_="xml".
<dynamic>
<render>
<xlsx render_textbox_="1"/>
</render>
<layout arrange_="v">
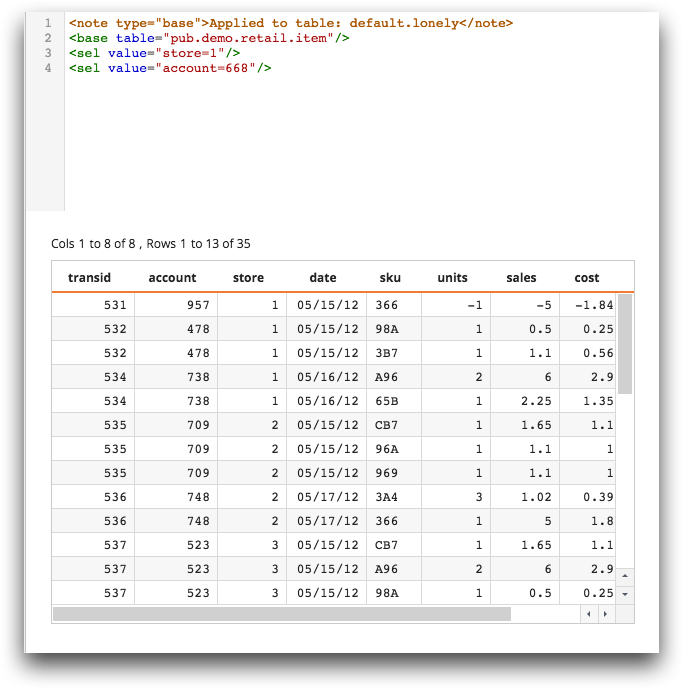
<widget class_="textbox" base_="pub.demo.retail.item"
height_="200" width_="500" mode_="xml" source_="ops">
<sel value="store=1"/>
<sel value="account=668"/>
</widget>
<widget class_="grid" base_="pub.demo.retail.item"/>
</layout>
</dynamic>
When rendered to the web, the output looks like the following:
When rendered to an Excel workbook, the output looks like:
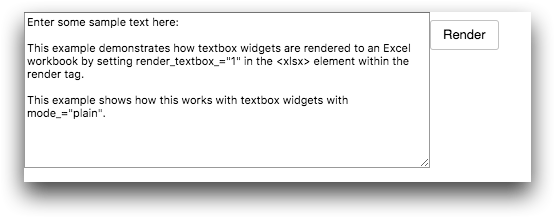
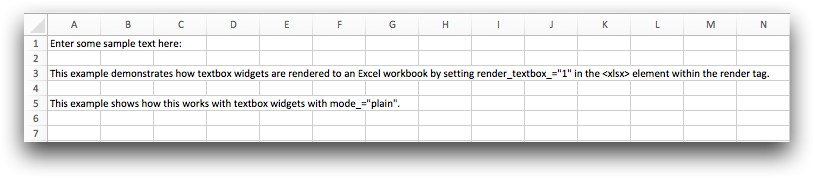
Example: Rendering textbox widgets with mode_="plain"
to an Excel workbook
The following example demonstrates how textbox widgets are rendered to an
Excel workbook by setting render_textbox_="1" in the
<xlsx> element within the <render> tag. This
example shows how this works with textbox widgets with
mode_="plain".
<dynamic x="Enter some sample text here:">
  <render>
    <xlsx render_textbox_="1"/>
  </render>
  <widget class_="textbox" mode_="plain" value_="@x"
   width_="400" height_="400" />
  <widget class_="button" type_="render" target_="xlsx"/>
</dynamic>
When rendered to the web, the textbox widget allows the user to enter
text:
When the Render button is clicked, the output is rendered to an Excel workbook, the output looks like:
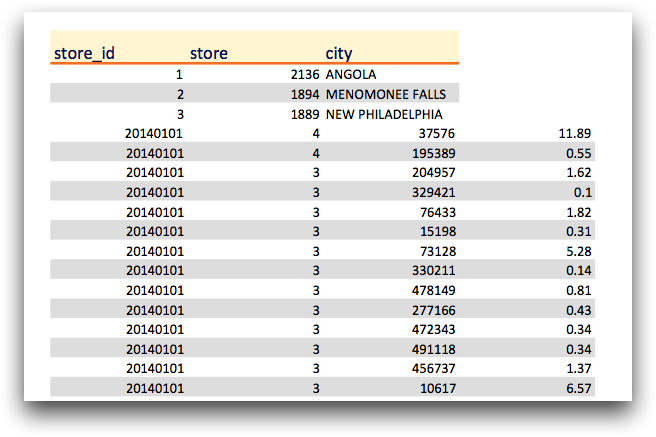
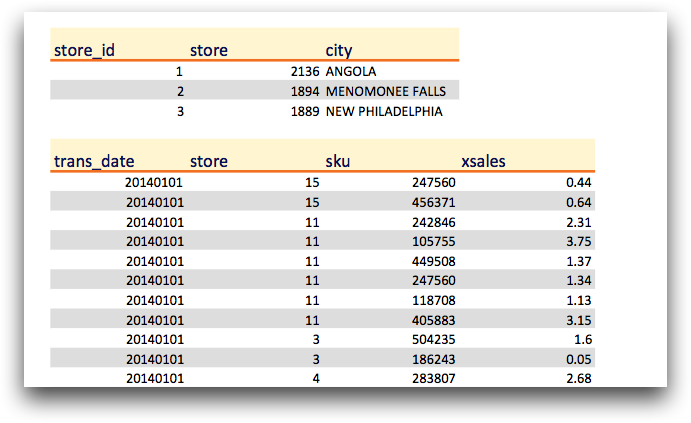
Example: Repeating a table as a title when printing a worksheet
The following example shows how to repeat a certain table at the top of every page when the
associated worksheet in the rendered workbook is printed. Because the
xlsx_printtitle_ attribute is set to 1 for the
grid widget associated with the
pub.demo.retail.store table, the rows of that table for the columns
specified in the <colord> will appear at the top of every page when the
associated worksheet is printed.
<dynamic>
  <layout arrange_="v">
    <widget class_="grid" base_="pub.demo.retail.store"
     xlsx_printtitle_="1">
      <colord cols="store_id,store,addr"/>
    </widget>
    <widget class_="grid" base_="pub.doc.retail.salesdetail">
      <sel value="i_<300"/>
      <colord cols="trans_id,trans_date,tme,store,sku,xsales"/>
    </widget>
  </layout>
</dynamic>
When the worksheet is printed, the top of the first page will look like:
The top of the second page will look like: