Object Manager
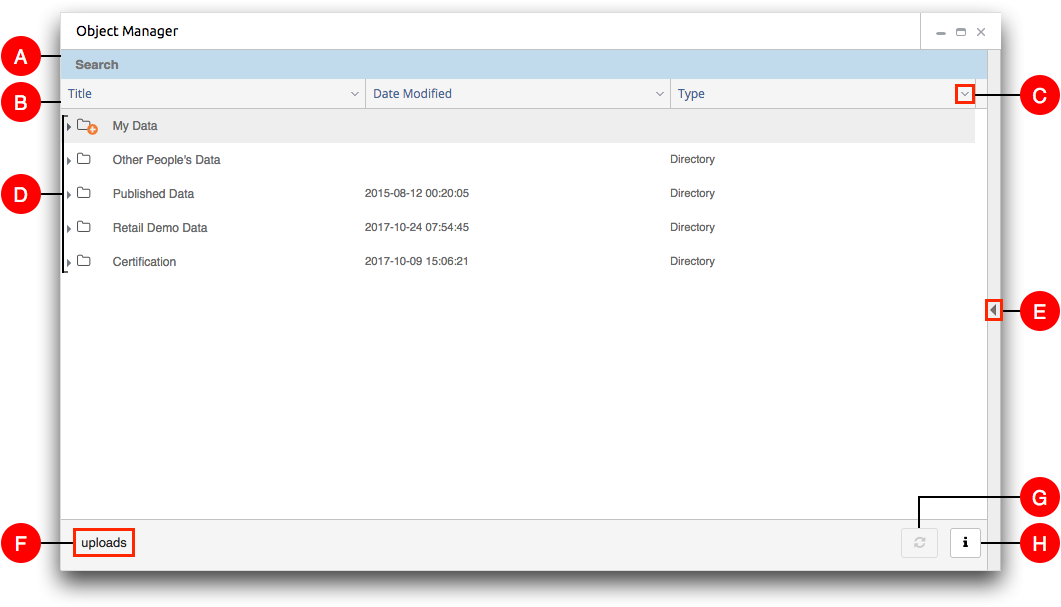
The Object Manager allows you to view and traverse the hierarchy of folders, tables, and other objects to which you have access, and to perform actions on those objects.

- A. Search
- Use this field to search for tables, folders, and other objects. For instructions, see Search for objects.
- B. Metadata columns
- Metadata columns display object information. Information for each metadata item is displayed in its own column. This allows you to display only the metadata information that you need. In addition, you can sort the object list by each metadata column. For more information, see Metadata columns.
- C. Options menu
- This drop-down arrow allows you to define the sort order of objects and to choose the object information you want displayed in the object browser.
- D. Object browser
- The object browser is a file browser that provides access to the objects you have
permission to use.
Traverse the folder hierarchy by clicking the Expand (
 ) icon to the left of a folder to open it and the Collapse (
 ) icon to close
it.
) icon to close
it.Objects in the file browser are represented by icons. For a list and description of these icons, see Object icons.
If you own an object, or have permission to save or upload an object into a folder, permission icons appear next to the object in the browser. For more information, see Permission icons.
When an object is selected, it is highlighted in gray and its path is displayed in the lower left-side of the window. In addition, as appropriate, the Refresh and Information icons are enabled.
- E. Show/Hide
- Click the Show (
 ) icon to display the right-side object browser pane in the Object Manager. Viewing both the left- and
right-side panes at the same time can help make some tasks easier. For example, when moving an
object from one folder to another, you can view each folder, side-by-side, in the two
panes.
) icon to display the right-side object browser pane in the Object Manager. Viewing both the left- and
right-side panes at the same time can help make some tasks easier. For example, when moving an
object from one folder to another, you can view each folder, side-by-side, in the two
panes.When both object browser panes are visible, click the Show (
 ) icon to hide the left-side
pane or click the Hide (
 ) icon to hide the right-side. Additionally, you can resize the
panes using the split bar handle located between the Show and
Hide icons.
 - F. Path
- When an object is selected, its full path is displayed. The full path includes the path to, and the name of, the object.
- G. Refresh
- Click this icon to update an object in your session with data from the database. For more information, see Refresh an object.
- H. Information
- This icon opens the information dialog which displays additional information about a selected object. If you have permission, you can also modify the properties of the selected object. For more information, see Information dialog.
