class_="nest"
Using <widget class_="nest">, widgets can be dynamically generated
based on parameterized values.
Explicit Syntax
<dynamic>
      <layout>
        <widget class_="nest">
          <dynamic>
            <layout>
             <foreach var="[ITERATING_VALUE]">
               <widget class_="[VALID_CLASS_VALUE]"
                value_="{[ITERATING_VALUE]}"/>
             </foreach>
            </layout>
          </dynamic>
        </widget>
    </layout>
</dynamic>
Implicit Syntax
<dynamic>
      <layout>
          <dynamic>
            <layout>
             <foreach var="[ITERATING_VALUE]">
               <widget class_="[VALID_CLASS_VALUE]"
                value_="{[ITERATING_VALUE]}"/>
             </foreach>
            </layout>
          </dynamic>
    </layout>
</dynamic>
Attributes
bind_- Specifies variables in the inner
<dynamic>that should be bound to variables specified in theto_attribute.The
bind_attribute and theto_attribute work together to ensure that variables in the outer<dynamic>are able to use values set in the inner<dynamic>of a QuickApp usingclass_="nest". to_- Specifies variables in the outer
<dynamic>that should reflect the values of variables specified in thebind_attribute.The
bind_attribute and theto_attribute work together to ensure that variables in the outer<dynamic>are able to use values set in the inner<dynamic>of a QuickApp usingclass_="nest". extend_umbrella_- Determines whether or not the
<dynamic>query within thenestwidget adopts the same umbrella hash as the surrounding<dynamic>. Accepts1or0.Exercise caution when using this feature as
<widget
                class_="nest">
by its nature makes it easy to run arbitrary Macro Language code under the control of the user, and if the code is run against a filtered table that checks the query hash, that code will be running with the same access as the surrounding QuickApp.The default is
0.(Available as of version 10.37)
target_- Specifies the type of target to which the widgets within the nested
<dynamic>will be rendered.Valid values are:
xlsx- Render grid and chart widgets to an Excel workbook.
For a full list of attributes available for the
xlsxrender target, see <xlsx>. data- Render grid widgets to a delimited flat file.
For a full list of attributes available for the
datarender target, see <data>. pdf- Render grid and chart widgets to a PDF.
web- Render all widgets to the web interface.
The default is
web.Use the
filename_attribute to specify the name of the downloaded file (for targets other thanweb).(Available as of prod-9)
filename_- Specifies the name of the downloaded file (for targets other than
web).The file extension does not need to be provided. A valid extension for the file type specified in the
target_attribute will be appended to the saved file when applicable.The default is
download. onrender_- Specifies whether or not to export to the specified target when the QuickApp is first
rendered. Accepts a
1or0.When
target_is set to a non-web target (e.g.,xlsx,pdf,data) andonrender_="1", the contents of thenestwidget are exported to the specified target upon initial render of the QuickApp.The default is
0.
Why is class_="nest" necessary?
Prior to the implementation of class_="nest", it was possible to
dynamically generate widgets in a <dynamic> by using a
<for> loop. However, there were some issues that made this
prohibitively restrictive. For example, the following works:
Works!
<base table="default.lonely"/>
<dynamic>
  <for i="1" to="4">
    <widget border_="1" class_="text" text_="{@i}"/>
  </for>
</dynamic>
This example is useful if you know exactly how many text widgets are needed in the final
QuickApp. However, if the to_ attribute requires an unknown value (for
these purposes, let's say it's a value that is stored in a variable), the same code does not
work:
Doesn't Work!
<base table="default.lonely"/>
<dynamic terminate="4">
  <for i="1" to="{@terminate}">
    <widget border_="1" class_="text" text_="{@i}"/>
  </for>
</dynamic>
The example above returns a system error stating that no widgets are in the
<dynamic>.
To work with unknown values or values stored in variables, the solution is
class_="nest".
Example: Generating widgets dynamically (implicit syntax)
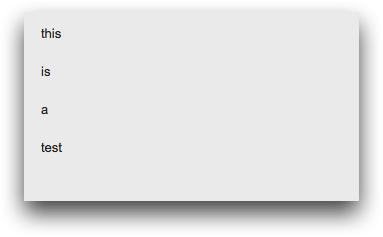
The following example uses the implicit syntax of class_="nest" to
demonstrate how a parameterized value can be used to dynamically generate widgets.
<dynamic list="{str_to_lst('this,is,a,test';)}">
  <layout>
    <dynamic>
      <layout arrange_="v">
        <foreach var="{@list}">
          <widget class_="text" text_="{@var}"/>
        </foreach>
      </layout>
    </dynamic>
  </layout>
</dynamic>
Example: Generating widgets dynamically (explicit syntax)
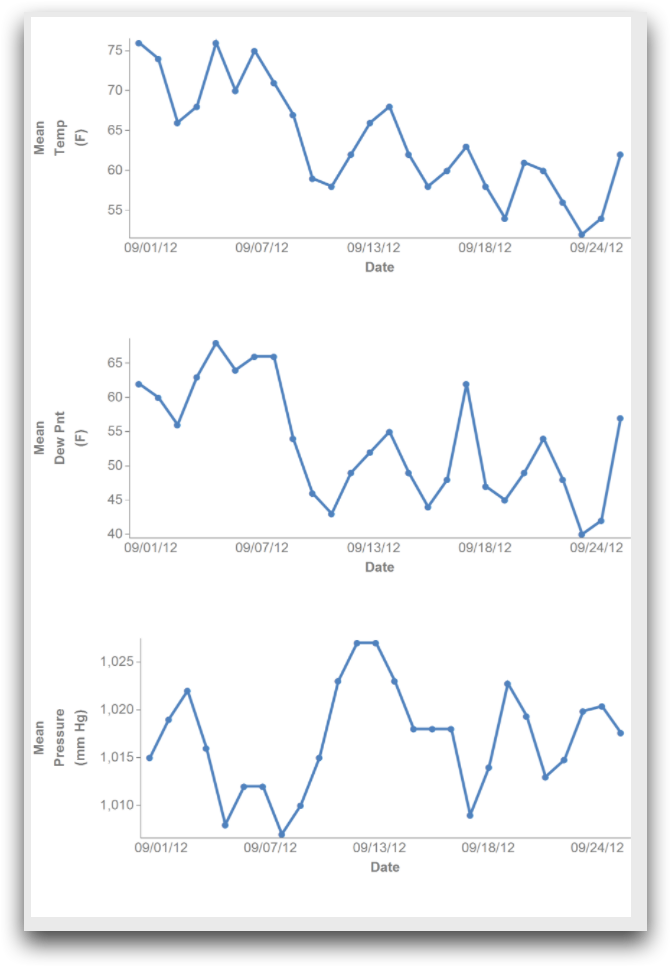
The following example uses the explicit syntax of class_="nest" to
demonstrate how multiple graphs are dynamically generated based on a parameterized value.
This example generates three charts using a public weather data set
(pub.demo.weather.wunderground.observed_daily) based on the column
names defined in the metrics dynamic variable.
<defblock name="define_selections">
  <base table="pub.demo.weather.wunderground.observed_daily"/>
  <sel value="(zipcode='01001')"/>
  <sel value="between(date;20120901;20120930)"/>
</defblock>
<dynamic metrics="{lst('meantempi' 'meandewpti' 'meanpressurem')}">
  <widget class_="nest" insert_="define_selections">
    <dynamic>
      <layout align_="v">
        <foreach inc="{@metrics}" tally="@i">
          <widget class_="graphics" width_="800" height_="400"
           metrics="{@inc}">
            <graphspec width="600" height="400">
              <chart type="line" samples="100000">
                <data x="date" y="{@metrics}"/>
              </chart>
            </graphspec>
          </widget>
        </foreach>
      </layout>
    </dynamic>
  </widget>
</dynamic>
Example: Generating widgets dynamically based on user interactions
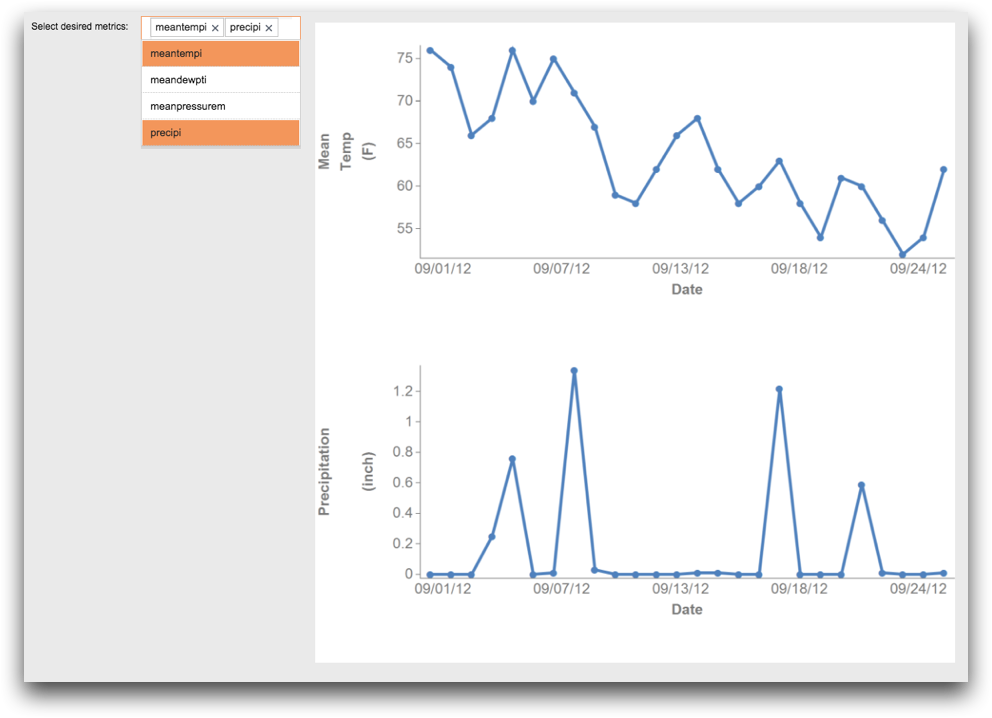
The following example demonstrates how the nest widget can be used to
generate widgets dynamically based on user interactions. A dropdownlist
widget allows the user to select which graphs are displayed. The selections are saved as a
list-value in the dynamic variable selected. When this variable changes,
the nest widget updates automatically, creating a graphics
widget for each item in the selected list-value.
<defblock name="define_selections">
  <base table="pub.demo.weather.wunderground.observed_daily"/>
  <sel value="(zipcode='01001')"/>
  <sel value="between(date;20120901;20120930)"/>
</defblock>
<defblock name="define_metrics"
 metrics="{str_to_lst('meantempi,meandewpti,meanpressurem,precipi';)}">
  <table depth="1"/>
  <foreach row_val="{@metrics}" tally="@i">
    <willbe name="metric_{@i}" value="'{@row_val}'"/>
  </foreach>
  <transpose/>
</defblock>
<dynamic selected="{lst()}">
  <widget class_="dropdownlist" label_="Select desired metrics:"
   insert_="define_metrics" listvalue_="@selected"/>
  <widget class_="nest" require_="{lst_len(@selected)>0}" invmode_="hide">
    <dynamic>
      <layout align_="v">
        <foreach metrics="{@selected}" tally="@i">
          <widget class_="graphics" insert_="define_selections"
           width_="800" height_="400" metrics="{@metrics}">
            <graphspec width="600" height="400">
              <chart type="line" samples="100000">
                <data x="date" y="{@metrics}"/>
              </chart>
            </graphspec>
          </widget>
        </foreach>
      </layout>
    </dynamic>
  </widget>
</dynamic>
Using bind_ and to_
bind_ and to_ attributes to link
variables in the inner and outer <dynamic> tags. Filters are dynamically
generated and the values assigned to the variables they populate are then used in a query.
The results of the query are reflected in the grid widget in the outer
<dynamic>. This example works on any
table.<library> <block name="get_cols" tablename=""> <base table="{@table_name}"/> <columns/> <colord cols="name,label"/> </block> <defop name="selector" boolean="" count="" cols="" vals=""> <set> <sel_expr> <for i="1" to="{@count}"> <let col="{lst_pick({@cols};{@i})}" val="{lst_pick({@vals};{@i})}" fun="has"> <if test="{@i<=@count}"> <then> <if test="{@i>1&@col<>''&@val<>''}"> <then>{@boolean} </then> </if> <if test="{@col<>''&@val<>''}"> <then>({@col}={@val}) </then> </if> </then> </if> </let> </for> </sel_expr> </set> <if test="{@sel_expr<>''}"> <then> <sel value="{@sel_expr}"/> </then> </if> </defop> </library> <dynamic cols="{mklst(3;'')}" funs="{mklst(3;'')}" vals="{mklst(3;'')}" filter_cnt="1" table_name="" fld="" bool="|"> <do onchange_="@table_name"> <set cols="{mklst(3;'')}" vals="{mklst(3;'')}"/> </do> <layout arrange_="v"> <widget class_="browser" value_="@table_name" label_="Select Table" filter_="folder,table" accept_="table"/> <widget class_="dropdown" value_="@filter_cnt" label_="Filters"> <table>1;2;3; </table> </widget> <widget name="bool_picker" class_="radio" value_="@bool" invmode_="hide"> <table>|,Or;&,And </table> </widget> <widget class_="nest" bind_="cols,vals,table_name" to_="cols,vals,table_name" require_="{@table_name<>'default.lonely'}"> <dynamic> <layout arrange_="v"> <for i="1" to="{@filter_cnt}"> <layout arrange_="h"> <widget class_="dropdown" value_="@cols.{@i}"> <insert block="get_cols" tablename="{@table_name}"/> </widget> <widget class_="text" text_="Has the values" deflabel_="Select"/> <widget class_="field" value_="@vals.{@i}"/> </layout> </for> </layout> </dynamic> </widget> <widget class_="button" type_="submit" text_="Submit"/> <widget class_="grid" update_="manual" type_="scroll" label_="{@table_name}"> <base table="{@table_name}"/> <selector boolean="{@bool}" count="{@filter_cnt}" cols="{@cols}" vals="{@vals}"/> </widget> <widget class_="textbox" source_="ops" mode_="xml" update_="manual"> <base table="{@table_name}"/> <selector boolean="{@bool}" count="{@filter_cnt}" cols="{@cols}" vals="{@vals}"/> </widget> </layout> </dynamic>
Example: Exporting to an Excel workbook
The following example demonstrates how to use <widget class_="nest"> to
export the contents of a nested <dynamic> to an Excel workbook. The
target is specified by setting target_="xlsx". The export is triggered when
the Export button is clicked, which increments the value of the
dynamic variable r. Because the inner <dynamic> defines
a variable updates that references the value of r, the
nest widget is refreshed when the value of that variables changes.
<dynamic r="0">
  <widget class_="nest" target_="xlsx">
    <dynamic updates="{@r}">
      <widget class_="grid">
        <base table="pub.fin.econ.fed.fred"/>
        <sel value="date=19600201"/>
      </widget>
    </dynamic>
  </widget>
  <widget class_="button" type_="set" text_="Export"
   value_="@r" newvalue_="{@r+1}"/>
</dynamic>
Example: Rendering to various targets
The following example demonstrates how a QuickApp specified within a nest
widget can be rendered to different targets using the target_ attribute. In
this example, a dropdown widget is provided so that the user can select
which render target to use. Once the user clicks the Render button,
the nest widget is triggered to update and uses the value saved to the
targ dynamic variable as the value for the target_
attribute. Based on which target is specified, the appropriate attributes specified within
the <render> tag for the nested QuickApp are applied, and the QuickApp
is rendered to the target.
<dynamic targ="">
  <widget class_="dropdown" value_="@targ"
   label_="Choose render target">
    <table>pdf;xlsx;data;web
    </table>
  </widget>
  <widget class_="button" type_="submit" text_="Render" submit_="dl"/>
  <widget class_="nest" name="dl" update_="manual" invmode_="hide"
   require_="@targ" target_="{@targ}">
    <dynamic store="1,2,3">
      <render>
        <web into_="browsertab">
          <widget class_="grid"
           headerbgcolor_="blue" headerfontcolor_="yellow"/>
        </web>
        <xlsx headerbgcolor_="green" headerfontcolor_="white"/>
        <data headers_="names,labels" filename_="datadump" ext_="txt"/>
      </render>
      <widget class_="dropdownlist" value_="@store"
       base_="pub.demo.retail.item" label_="Select a store">
        <tabu breaks="store"/>
      </widget>
      <widget class_="grid" base_="pub.demo.retail.item"
       require_="{@store<>''}" invmode_="hide">
        <sel value="store={@store}"/>
      </widget>
    </dynamic>
  </widget>
</dynamic>
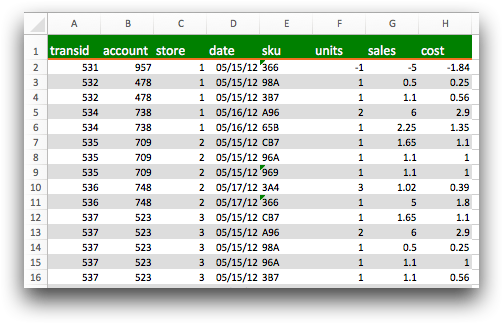
For instance, if the user selects xlsx from the
dropdown widget and clicks Render, the nested
QuickApp is rendered to an Excel workbook, and the header of the grid
widget in the nested QuickApp renders as white text on a green background.

If the user selects web from the dropdown widget
and clicks Render, the nested QuickApp is rendered to a new browser
tab. The header of the grid widget in the nested QuickApp renders as yellow
text on a blue background, since the headerbgcolor_ and
headerfontcolor_ are specified to the grid widget inside
the <web> tag. Those attributes are applied to all grid
widgets when rendered to a web target.
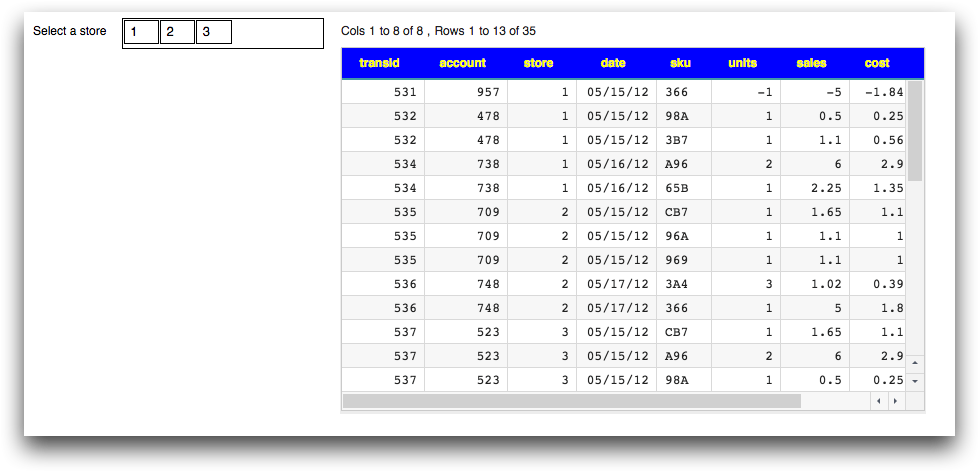
Note that the dropdownlist widget in the nested QuickApp is rendered in
the web target, but not when rendered to Excel, PDF, or a data target
Using <switch> inside of class_="nest"
Note that the variable j referenced inside <switch> is
defined outside the inner <dynamic>.
<dynamic j="0">
  <widget class_="nest">
    <dynamic i="0">
      <switch>
        <case when="{@j=1}">
          <widget class_="text" text_="hello"/>
        </case>
        <else>
          <widget class_="text" text_="goodbye"/>
        </else>
        </switch>
      </dynamic>
    </widget>
  </dynamic>
