type_="render"
Using type_="render" creates a button that exports the widgets of a
QuickApp to a valid output type, such as an Excel workbook.
Syntax
<dynamic>
    <widget class_="button" type_="render" target_="[TARGET_TYPE]"
     text_="[BUTTON_NAME]"/>
    [OTHER_WIDGETS_OR_LAYOUTS]
</dynamic>
Attributes
target_- Specifies the type of target to which the QuickApp widgets will be rendered.
Valid values are:
xlsx- Export grid and chart widgets to an Excel workbook.
For a full list of attributes available for the
xlsxrender target, see <xlsx>. pdf- Export grid and chart widgets to a PDF.
For a full list of attributes available for the
pdfrender target, see <pdf>. data- Export grid widgets to a delimited flat file.
For a full list of attributes available for the
datarender target, see <data>.
filename_- Specifies a file name under which the downloaded item will be saved.
The file extension does not need to be provided. A valid extension for the file type specified in the
target_attribute will be appended to the saved file when applicable.The default is
download. include_- Accepts the names of
<widget>and/or<layout>elements contained in the<dynamic>that are to be included in the rendered output.If the name of a<layout>element is passed toinclude_, all widgets contained by the<layout>will be included in the render operation.Note: Ifinclude_is used, only widgets whose names were passed toinclude_will be rendered. exclude_- Accepts the names of
<widget>and/or<layout>elements contained in the<dynamic>that are to be excluded from the rendered output.If the name of a
<layout>element is passed toexclude_, all widgets contained by the<layout>will be excluded from the render operation.
Example: Exporting to an Excel workbook
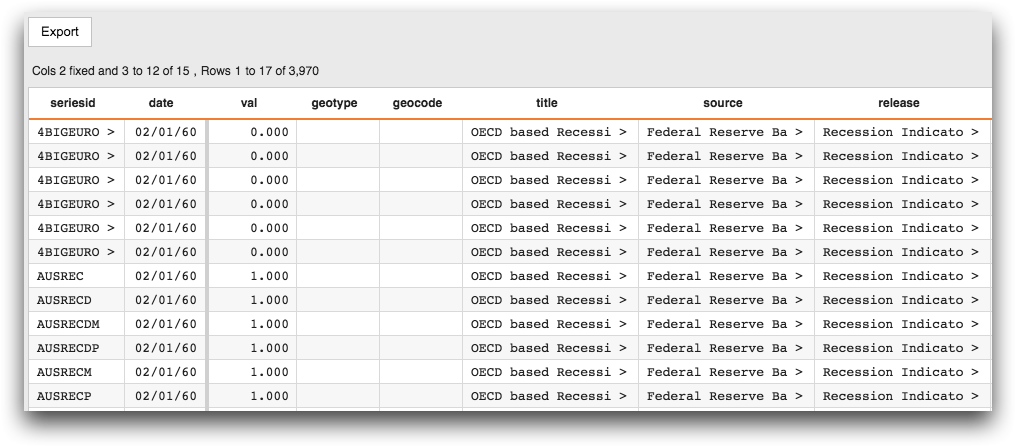
In the following example, when the user clicks the Export button in
the QuickApp, the grid widget is downloaded as an Excel workbook to the
local machine.
<base table="pub.fin.econ.fed.fred"/>
<sel value="date=19600201"/>
<dynamic>
  <layout arrange_="v">
    <widget class_="button" type_="render" target_="xlsx"
     text_="Export"/>
    <widget class_="grid" name="grid" type_="scroll"
     width_="1500" height_="500" colwidthref_="100"/>
  </layout>
</dynamic>

<widget class_="nest"> and specify the target using the
target_ attribute. For more information, see class_="nest".Example: Using include_ and exclude_
The following example demonstrates how to include or exclude certain layouts when rendering
to an Excel workbook using <widget class_="button" type_="render"
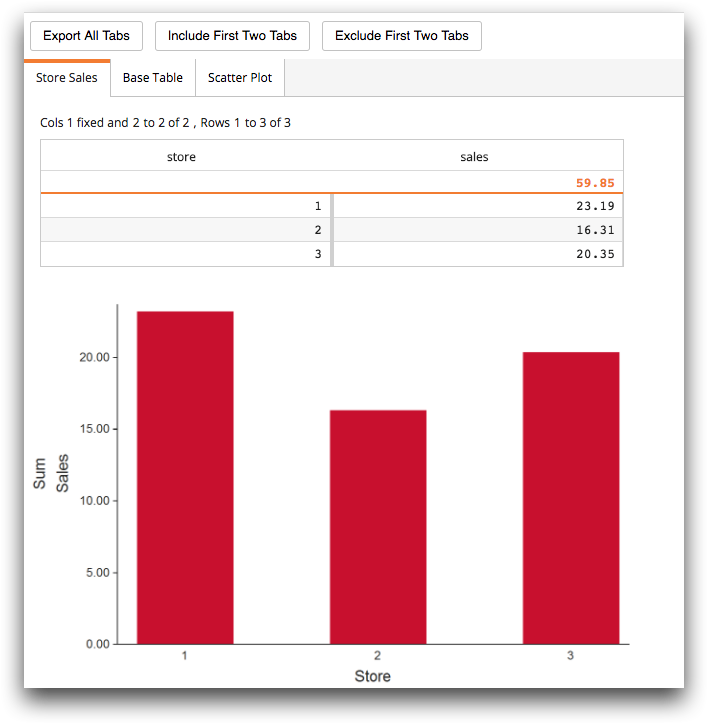
target_="xlsx">. The QuickApp consists of a layout that contains three
render buttons and a tabpanel layout that consists of
three layouts: store_sales, base_table, and
scatter.
The first render button doesn't specify either an
include_ or exclude_ attribute, so all widgets in all of
the layouts are rendered when the user presses this button. The second button specifies the
include_ attribute and lists the layouts store_sales and
base_table as its value. When the user presses this button, all the
widgets in these two layouts are rendered. The third button specifies the
exclude_ attribute and lists the layouts store_sales and
base_table. When the user presses this button, these two layouts are
excluded, so only the widgets in the third layout are rendered.
<defblock name="store">
  <base table="pub.demo.retail.item"/>
  <tabu breaks="store">
    <tcol name="sales" source="sales" fun="sum"/>
  </tabu>
</defblock>
<dynamic>
  <layout arrange_="v" width_="100%">
    <layout>
      <widget class_="button" type_="render" target_="xlsx"
       text_="Export All Tabs" filename_="All Tabs"/>
      <widget class_="button" type_="render" target_="xlsx"
       text_="Include First Two Tabs" filename_="Include"
       include_="store_sales,base_table"/>
      <widget class_="button" type_="render" target_="xlsx"
       text_="Exclude First Two Tabs" filename_="Exclude"
       exclude_="store_sales,base_table"/>
    </layout>
    <layout type_="tabpanel" name="tabpanel" width_="100%" border_="0">
      <layout name="store_sales" label_="Store Sales"
       xlsx_sheetname_="Store Sales">
        <widget class_="grid" type_="scroll" width_="600">
          <insert block="store"/>
        </widget>
        <widget class_="graphics" insert_="store" type_="bar"/>
      </layout>
      <layout name="base_table" label_="Base Table"
       xlsx_sheetname_="Base Table">
        <widget class_="grid" type_="scroll" width_="1000"
         base_="pub.demo.retail.item"/>
      </layout>
      <layout name="scatter" label_="Scatter Plot" xlsx_sheetname_="Scatter">
        <widget name="scatterplot" class_="graphics" type_="scatter"
         title_="Sales" base_="pub.demo.retail.item">
          <colord cols="sales,cost"/>
        </widget>
      </layout>
    </layout>
  </layout>
</dynamic>

